The Top Valorant Sova Lineups for Every Ascent Site
Sova is widely regarded as one of the top Initiators in Valorant due to his ability to gather vital information for his team using his primary abilities, Recon Bolt and Shock Bolt. However, for dedicated Sova players, it can be a daunting task to remember the intricate lineups for these abilities, particularly on larger maps like Ascent. Mastering all the Sova lineups requires months of practice and dedication, which can be a tedious endeavor for the average Valorant player. Recognizing the challenges faced by Sova mains, we have compiled a comprehensive list of the best and most user-friendly Sova lineups specifically tailored for the Ascent map.
By utilizing these carefully curated lineups, you will be able to efficiently gather crucial information and gain a strategic advantage for your Valorant squad. Whether you are scouting for enemies or setting up devastating shock dart plays, our Sova lineups for Ascent will streamline your gameplay and elevate your performance to new heights. Don’t let the complexity of lineups hold you back—embrace the power of Sova and dominate the battlefield with confidence.
Table of Contents
Best Sova lineups for defense on Ascent
From A-Heaven to A-Lobby
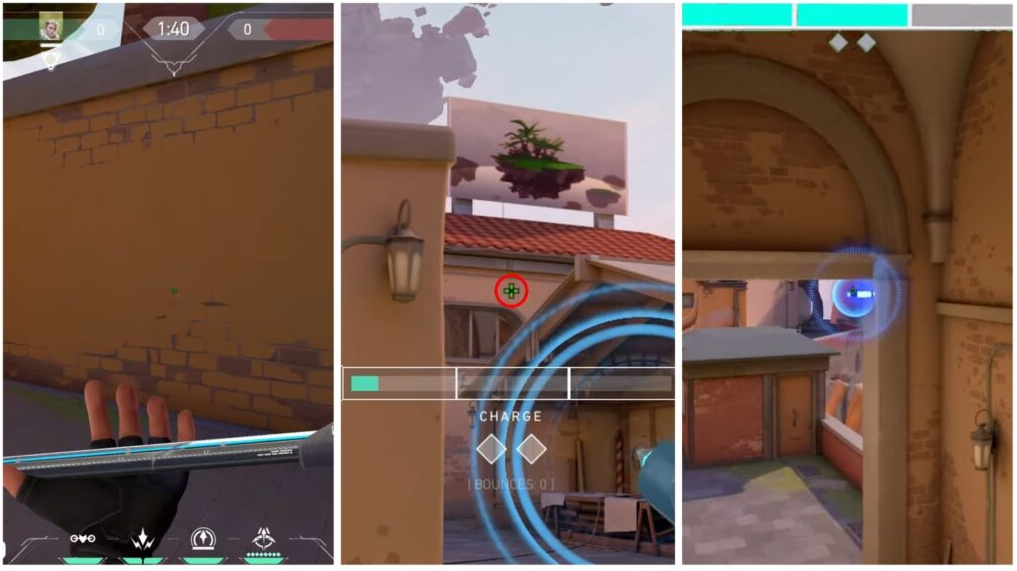
To kick things off as a Sova player, gathering enemy location information becomes a paramount objective. When playing on the Ascent map, a highly effective strategy is to head towards A-Heaven and position yourself behind the large box in the corner. This vantage point provides a solid cover while allowing you to maintain a clear line of sight. With your recon dart at the ready, it’s time to execute the lineup. Focus your attention on the A-short door, and carefully align your dart with the two bounce bars located nearby. This precise positioning is crucial for optimal results. Take a moment to analyze the provided image, ensuring that you’ve correctly matched the dart’s trajectory.
Now, it’s time to execute the shot. Charge your recon dart to two bars, carefully adjusting the power to achieve the desired distance. With a steady hand, release the dart, allowing it to soar through the air and land in the designated area. As the dart makes contact, it will emit a pulse, revealing valuable information about the enemy’s presence in the A-lobby. By following this lineup, you’ll be equipped with reliable intel to aid your team’s strategic decisions. Remember to practice this lineup in various scenarios to enhance your proficiency and adaptability on the battlefield. With time and experience, you’ll become a master of Sova’s reconnaissance abilities, providing a significant advantage to your Valorant team.
From A-site to Mid and A-short
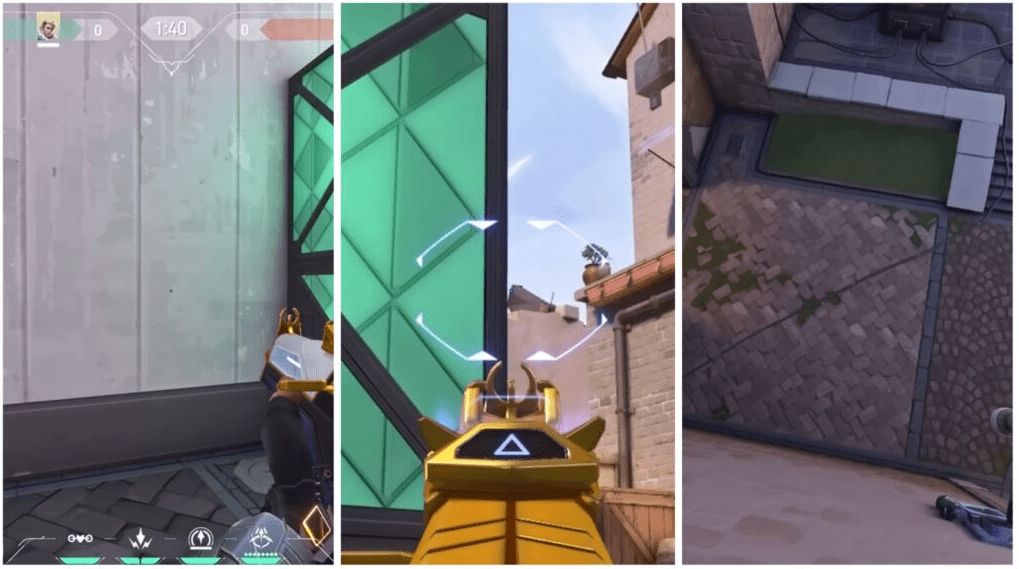
In the realm of Valorant, Sova’s defensive lineup is a game-changer, granting your team a significant advantage by gathering crucial information about enemy movements at mid or during an A-short rush. This strategic maneuver is especially effective when your team is playing at the tree position. To execute this lineup flawlessly, position yourself right next to the sturdy green concrete box on the A-site. This strategic placement offers both cover and an optimal vantage point. Take a moment to align the drone symbol with the borders of the concrete box, ensuring precise positioning for maximum effectiveness.
Now, let’s delve into the execution. Charge your Recon dart to a single bar, carefully adjusting the power to achieve the desired distance. With calculated precision, add one bounce to the dart’s trajectory, further optimizing its path. As you release the dart, watch as it gracefully traverses the battlefield, delivering invaluable reconnaissance information. By mastering this lineup, you become a formidable force on the defensive front, providing your team with a wealth of knowledge about enemy whereabouts. Remember to practice this lineup in various scenarios, adapting it to different situations and maps. With dedication and experience, you’ll elevate your Sova gameplay to new heights, ensuring your team’s success in the intense battles of Valorant.
From CT to Mid
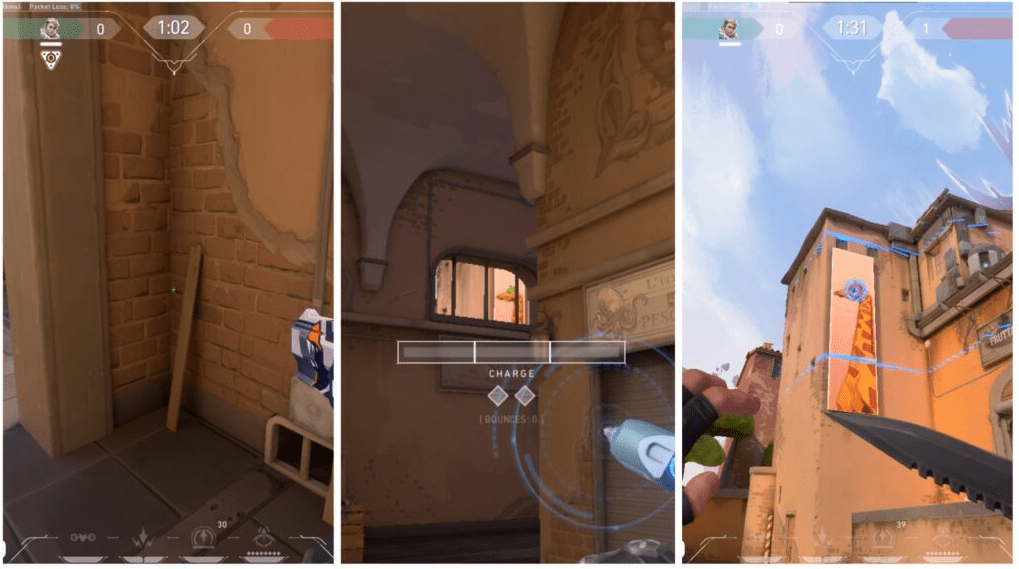
This Sova recon dart lineup is a valuable asset in the mid-round, enabling you to gather essential information on enemy rotations from A to mid through the market door. Aptly named, this lineup offers a strategic advantage when executed correctly. To initiate the lineup, make your way to the CT area and position yourself at the left corner. This positioning provides a solid foundation for executing the dart effectively. With your sights directed towards the sky, focus on aligning the second charge bar of your ability with the clock tower, ensuring it fits precisely between the two borders. This meticulous alignment sets the stage for a successful dart launch.
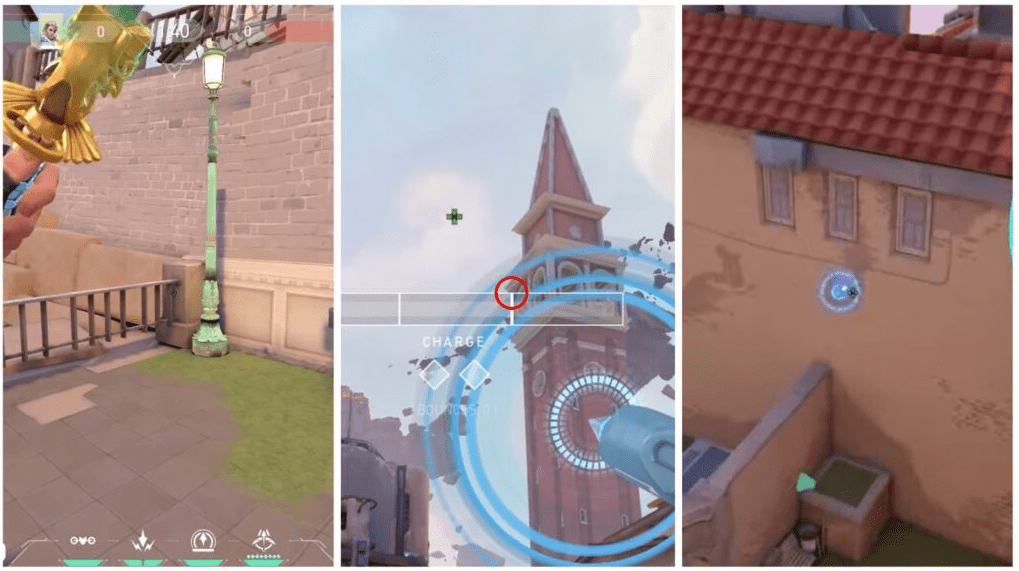
Now, it’s time to execute the lineup with precision. Charge your Recon dart to a single bar, carefully adjusting the power to achieve the desired distance. As you release the dart, ensure there is no bounce, allowing it to traverse the air swiftly and accurately towards its destination. By mastering this lineup, you gain a significant advantage by extracting vital intel on enemy movements. It is highly recommended to practice this lineup across various scenarios, adapting it to different angles and situations that may arise in your Valorant matches. With consistent practice and experience, you will become a formidable Sova player, providing your team with crucial knowledge that can turn the tide in your favor.
From B Site CT to B Lobby
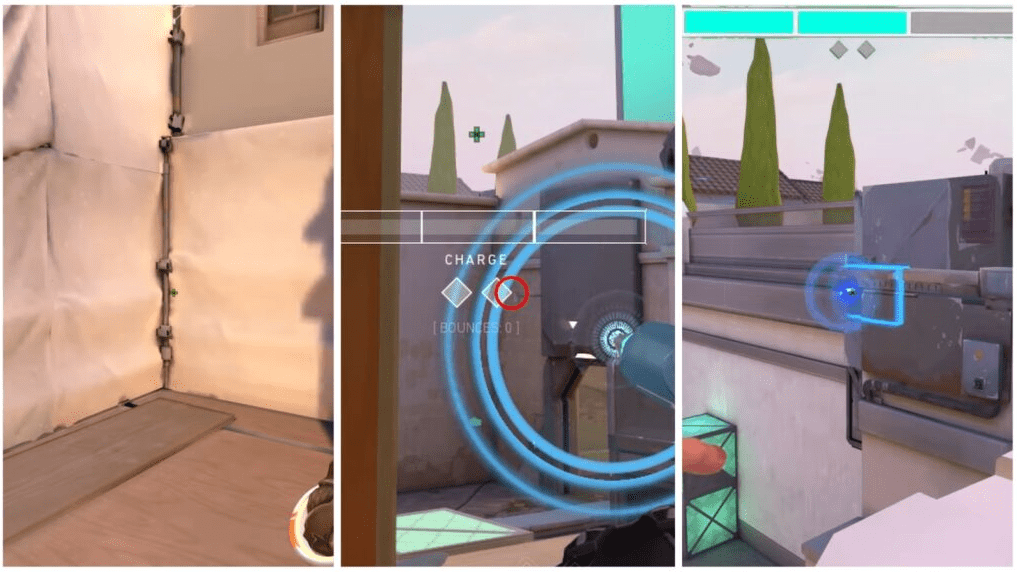
When it comes to defending the B-site in Valorant, this Sova lineup proves to be a game-changer. To execute it effectively, position yourself at the extreme left corner of the B-site CT area, ensuring a solid vantage point. Take note of the precise placement by aligning your crosshair just above the third portion of the window, specifically under the small line. For visual reference, refer to the provided images that showcase the exact recon dart positions. Once properly positioned, it’s time to release the dart with two charge bars. This strategically placed dart will scan the area, providing valuable information about any enemies rushing the B-site. It is highly recommended to utilize this lineup during the early round when you are actively defending the B-site.
By incorporating this lineup into your defensive strategy, you gain a significant advantage by acquiring vital enemy intelligence. The information gathered can help you and your team make well-informed decisions, increasing your chances of success in defending the B-site. To optimize your performance, practice this lineup in various scenarios and adapt it to different situations and angles. Through consistent practice and experience, you will become adept at executing Sova’s recon dart lineup, enhancing your overall impact on the battlefield and contributing to your team’s triumph in Valorant.
Best Sova lineups for attacking on Ascent
The famous Giraffe Recon Dart at B-site
In the ever-evolving world of Valorant, mastering Sova’s recon abilities is essential for gaining the upper hand in battles. One particular Sova lineup that shines on the attacking side of the Ascent map is hailed as both the easiest to execute and the most effective. To begin, position yourself at the extreme left of the B main entrance, ensuring a clear and advantageous spot. With your crosshair poised, direct your focus towards the giraffe’s eye, located just above the bustling market area. This precise alignment sets the stage for a successful recon dart launch. Now, it’s time to unleash the power of your recon dart. Charge it to its maximum potential, fully harnessing its capabilities. With a swift release of your mouse click, the dart soars through the air, scanning the area and gathering valuable intel along the way. This lineup is particularly useful during a B-rush, as it provides crucial information about key spots such as the market, the door switch, and both lanes leading to the B-site.
By incorporating this lineup into your attacking strategy, you equip yourself and your team with vital knowledge of the enemy’s positions and movements. This intel allows for better decision-making, enhanced coordination, and increased chances of success in capturing the B-site. To truly master this lineup, practice is key. Experiment with different scenarios and adapt the lineup to various situations that may arise during your matches on Ascent. With time and dedication, you will hone your skills as a Sova player, becoming a formidable force on the battlefield. Remember, the path to victory in Valorant lies in the mastery of your agent’s abilities. Embrace the challenge, refine your techniques, and seize every opportunity to excel as a Sova player on the Ascent map.
From A Main to close A-site
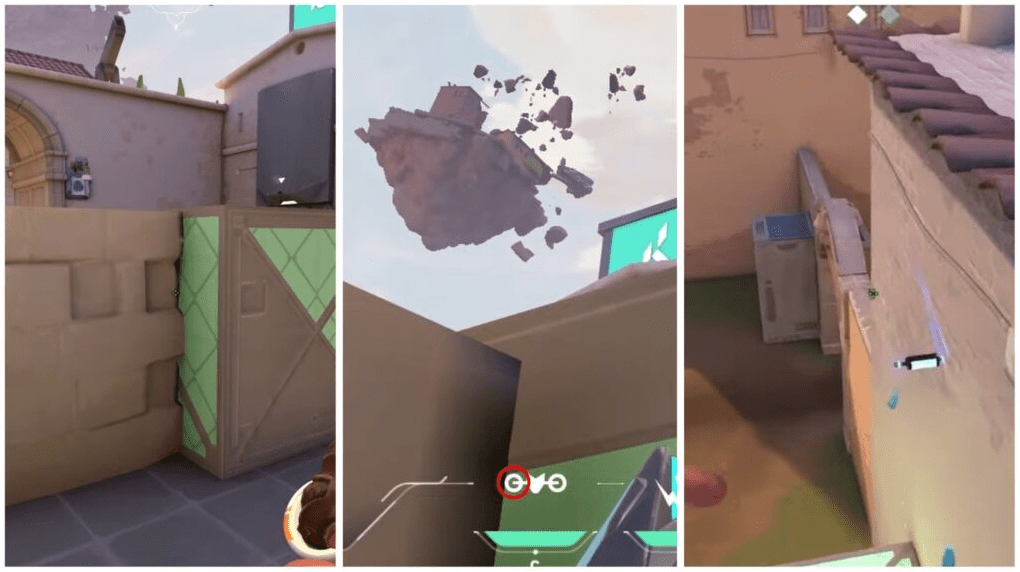
When it comes to executing a successful attack on the A-site in Valorant, one must address the challenge of dealing with enemies who often camp in close angles, armed with shotguns ready to catch unsuspecting assailants. To overcome this obstacle and ensure a strategic advantage, a specific lineup has proven to be highly effective. To begin, position your agent strategically behind the green box at the entrance of the A-site. This placement offers both cover and an optimal vantage point for engaging the enemy. With your crosshair aligned, direct your focus towards the black rock situated at the top. Now comes the crucial moment. Charge your dart to its maximum capacity, harnessing its power for maximum impact. As you release the dart, ensure it follows a trajectory that clears all the vulnerable spots at the A-site. This lineup is designed to neutralize threats in close proximity, creating a safer path for your team’s advancement.
Mastering this lineup is key to achieving a successful attack on the A-site. By effectively clearing the close angles, you minimize the risk posed by shotgun-armed opponents and gain control over the battlefield. It is highly recommended to practice this lineup in various scenarios, adapting it to different maps and situations that may arise during your matches. With dedication and experience, you will become a skilled attacker, equipped with the knowledge and techniques necessary to conquer the A-site in Valorant. Embrace the challenge, refine your skills, and lead your team to victory by dismantling the defenses of your opponents in close quarters.
Post Plant A-site
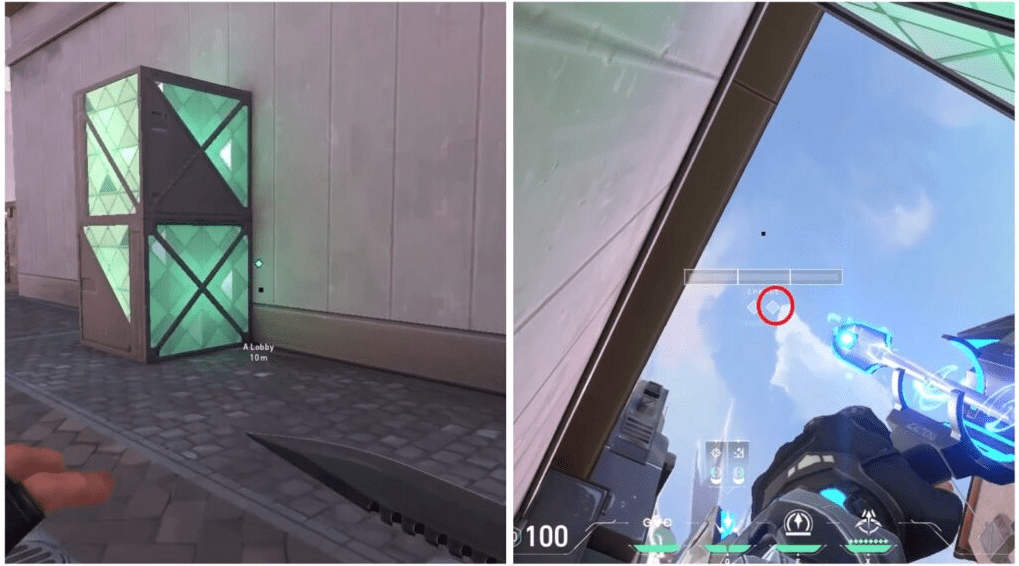
In addition to gaining valuable information about enemy locations, it is essential to familiarize yourself with post-plant Shock Dart lineups to secure pivotal rounds while maintaining a hidden presence at the site. To execute this lineup effectively, position yourself adjacent to the green box in the A-lobby. Align your aim so that the second bounce bar of your ability targets the tip of the cloud. When ready, release the shock dart with a full charge, ensuring it travels directly to the default location without any bouncing, effectively eliminating any opponents attempting to defuse the spike.
Mastering these post-plant Shock Dart lineups allows you to exert control over the situation even after planting the spike, increasing your chances of securing crucial rounds. It is highly recommended to practice these lineups in a variety of scenarios, adapting them to different post-plant positions and situations that may arise during your matches. By honing your skills and becoming proficient in executing these lineups, you will be able to contribute significantly to your team’s success in Valorant. Utilize your knowledge and surprise your opponents by eliminating them from hidden positions, ensuring victory in crucial rounds and securing the objective without revealing your location.
Post Plant B-site
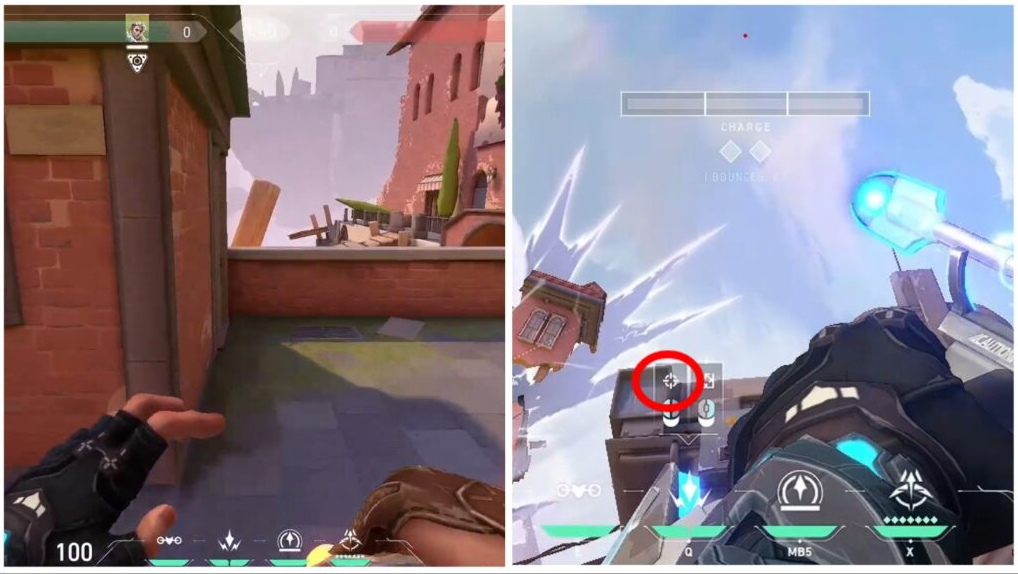
When it comes to post-plant situations on the B-site in Valorant, mastering the art of Shock Dart lineups is essential for securing crucial rounds and maintaining control without exposing your position. To execute this lineup effectively, position yourself next to the small hut near the B entrance. From there, direct your gaze towards the sky and align your shock dart precisely, ensuring the symbol matches up with the border as illustrated in the provided image. Having aligned your shot, the next step is to charge your shock dart to its maximum potential. With a swift and accurate throw, unleash the dart to tackle the default spike plant situation on the B-site. This strategic lineup is designed to disrupt and eliminate opponents attempting to defuse the spike, giving you and your team a significant advantage in the post-plant scenario.
Mastering these post-plant Shock Dart lineups on the B-site is a skill that can turn the tide of the game in your favor. By effectively executing this lineup, you can neutralize enemy defusing attempts and maintain control over the objective. It is highly recommended to practice these lineups in various scenarios, adapting them to different post-plant positions and situations that may arise during matches. With dedication and experience, you will become proficient at executing these lineups, elevating your gameplay and contributing to your team’s success in Valorant. Embrace the challenge, refine your techniques, and utilize the power of Shock Darts to secure victory in post-plant situations on the B-site.


